Tuesday, November 29, 2016

Thanksgiving Weekend: Olivia's Ornaments


Hi Everyone...

I saw that most people had a fabulous Thanksgiving either at home or away. I, in fact, spent my 'first' Thanksgiving away from my home. My grandson and I were invited to my son's mother in law's home and we were grateful to be asked.

I took an antipasto (can't get away from the italian in me) and a crockpot of turkey gravy. My daughter in law's mashed potatoes are the bomb diggity, so this girl woulda been happy with just those. However, everyone brought delicious food and a lot of it.

The day after Thanksgiving, it is a tradition to do home made ornaments with the kids. I was excited that I was able to spend the day with Olivia (my grand daughter) and carry on that tradition.

I already had my tree up with the lights on, but Olivia put the decorations on it just after she arrived.


I never tire of seeing my tree lit. I had just arrived in Florida the 8th of December last year, so I really didn't have time to put up decorations and enjoy them. I was very busy unpacking and trying to set up house.

After we put the ornaments on the tree, we went to work making Olivia's first traditional ornaments with 'Manna'.


The peppermint candy and the reindeer bulb were ideas from a YouTube video. The wreath is an ornament I have made with my kids and my grown grandkids in the past.

Since Hurricane Matthew came through, everyone in the neighborhood is just seeming to get the tail end of clean up and repairs done. I still have fences to fix, but I was able to finally paint the base of one of my outside tables. I may not get to painting the chairs for a while, but its nice to have the glass back on the table top for now.


We have had beautiful weather here in Florida (ok, I'll admit that I freeze after about 5pm when the temps go down into the 70s and continue to fall into the 50s at night). I have no idea how I survived the winters in Utah for so long.

With the beautiful daytime temperatures comes more outdoor time for me. Though the electrical pole and wires at the corner of my back yard are an absolute eyesore, sometimes, I am able to look past them at a more awesome sight.
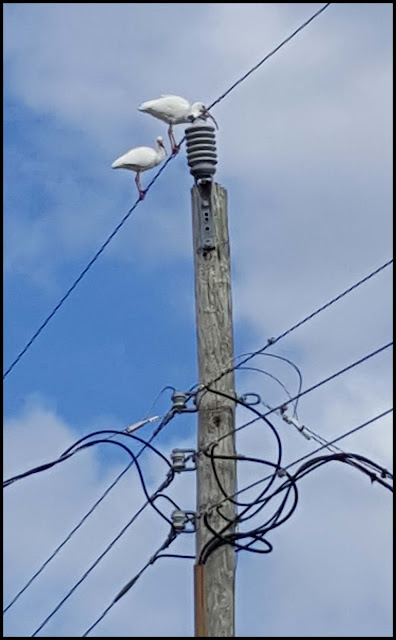
Ibis

Amidst all the weekend activities, I was able to finish a painting and I will post that on Saturday. But for now, I have to get back to reality and pay some bills or my Christmas lights will be off and I won't be able to watch ELF on tv :)

I hope you all are as excited as I am for this Christmas spirit that is beginning to take over. Sometimes you just need that.... and your angels to make an appearance.


Saturday, November 26, 2016

The Decision to Sell My Original Artwork: Part 2 - How I Let Go

Last Tuesday, I walked you through my art journey so far. That was important, as it explains the mental process of how I (and many artists) get attached to their art.

Each step of my journey, I fall in love with the notable quality of work that I am producing. Those pieces are hard to part with.... so I sell prints... hence I can retain the originals and my heart is happy.


But, now I am finding that at each stage of my artistry evolution, I am producing more and more paintings. Though I am usually very attached to the first piece, I finally find myself able to let go of similar pieces that I create.


It took me a long time (over 3 years) to make this decision, and I finally let go of three of my originals to a close friend who wanted them to hang in her office as inspiration for her clients. Since then, I have opened an Etsy Shop and hopefully I can view this as "my art going to a home that will display it with love."

OK... that sounds like it was an easy decision. It was anything BUT easy. There is a ton of emotion involved in letting go, but I have ( short of going to therapy... haha) worked through this detachment issue.

So there it is... very much like Frou Frou's Let Go

"so let go
And jump in
Oh well whatcha waiting for
It's all right
'Cause there's beauty in the breakdown
(So let go) yeah let go
And just get in
Oh it's so amazing here
It's all right
'Cause there's beauty in the breakdown"

Written by Guy Sigsworth, Imogen Jennifer Heap • Copyright © Universal Music Publishing Group


Tuesday, November 22, 2016

The Decision to Sell My Original Artwork: Part 1 The Journey

Since I started painting in 2014, I have only recently sold a few "original" artworks.

You have to understand the journey of my art life to truly understand why it has taken so long for me to make this decision to sell some of my originals.

The journey, however is long, hence, this post is Part 1. I hope my pictures will keep you interested enough to keep reading and come back for Part 2 :)

In the past, I only sold prints of my paintings, notecards made from my paintings and, oh yes, I have sold coffee mugs adorned with my art. That, was easy. I was able to share my art with others and still had the originals to hold on to and look at.

I was proud of my work; how I have improved and how my style has morphed ( and is still changing as I learn).

Back in 2014, these were my first paintings:


These originals still hang in my studio. Is it because I think they are great paintings? No! But they ARE a reminder of a day when I was happy to be painting and proud of my beginning. I became attached to the sentiment that these paintings hold.

As time went on and I tried new techniques, and my art improved. This was the next stage (I found Copic markers!!!!!) :


I actually drew these girls on 4 x 6 sheets of scrap paper as I sat at my kitchen table. Full size paintings never came to fruition, but I still have some of the original illustrations in a zip lock bag.

From these cute little whimsical faces, came more confidence. With that confidence, I created a series I called "International Girlz". 


I loved these paintings and was so proud of my artisitic growth. I sold MANY prints of these paintings, as well as notecards. Each of these are shrink wrapped and they sit on a shelf in my studio. How on earth could I ever sell these? 

Last year, I made a decision to take a few art classes in hopes of improving my artistry and maybe develop a style that others would recognize. Since then, my art is changing and moving in a direction that I am not sure of, but I am enjoying.

Part 2 of this post will be out in a few days and will explain how I am able to let go. I think this is a struggle for many artists.


Saturday, November 19, 2016

Artting with Olivia

Last weekend I had the opportunity to keep Olivia (my granddaughter) over night.

We like to watched amovie, played a dice game and I taught her how to play "Rummy for Kids" . This is MY version of Rummy, where you only try to get 3 of a kind. She's 7 and can't remember all the rules or ways to get points.

Another one of our favorite activities is artting. Olivia loves all of the art supplies that I have in the studio and wants to use all of them whenever she can.

This weekend, I showed her how to draw a face, ink it with a micron pen and then add watercolor as her paint medium. We actually went live on Facebook as we were in the process. Olivia was excited to see everyones comments.

Here is Olivia's finished painting. It came out AMAZING!


And, my painting when Olivia left...


I added some elements to mine and now she looks finished.


This piece is for sale in my Etsy shop.

Thank you for following my life and art journeys. I love sharing with you.

Tuesday, November 15, 2016

Byrd Street Studio Update: Hint of Asian and more...

I always want to share snippets of what is going on in the studio, but I am not comfortable as a writer. It's difficult for me to write blog posts. I just want to show pictures. If I was a writer of books, they would most likely be picture books :)

Last week, I was working on a painting and it really evolved over days.

First of all, I received some wonderful paints from ColourArte and I wanted to try them. Look at these gorgeous colors.


I wanted to use this paint on a girl's hair, so that's where this painting began.  I created a background with Dylusions paints as I love the bright colors. 


Then, I drew a girl's face and gave her a light coppery hair color with my Vivid  Ultra Metallics  in Ginger Peach. 


Using scraps of paper, I began adding them to create a dress, but I soon saw a kimomo in the collage. I decided to move forward and continue with an Asian influence by adding a semblance of Japanese houses. The houses and the green hills were also painted with the Vivid Ultra Metallics from ColourArte.


I need to practice drawing hands. My girls are not realistic, so hands need not be either, but I think the end result here was acceptable. 

Oh my heck, you'll never guess what I got this morning!!!!!! Yup, more free (on the side of the road) furniture for transformation!  Actually, my neighbor knocked at my door to let me know that another neighbor had put them out for trash.


I feel blessed that my friends love the furniture I have repurposed so much that they are keeping an eye out for me. 

UPDATE:  
Everyday, I try to add a few more originals to my Etsy shop, so please stop by and take a look. Christmas is right around the corner, so now is the time to shop for friends and family.

As always, thank you for following in my life and art journeys.


Tuesday, November 8, 2016

The Shop is OPEN

I am so excited to share that Byrd Street Studio's Etsy Shop has been open for a few days now.

I once had an Etsy shop, years ago, where I sold prints of my art, but I have decided to start selling some of the originals. I'll be adding pictures of the artwork daily until I get caught up. It is very time consuming as I have to scan most in two or more pieces and then use Photoshop to piece them together. I want to have a picture that depicts the original as closely as is possible.

I would love for you to follow my shop and share it with others.

Also, I have finally gotten two coats of polyacrylic on the Whimsical Table and Chair and it is now for sale as a set.

$400.00 plus shipping

If you or anyone you know is interested, please send me an email or 
PM me on facebook : 
tjvilello@gmail.com 
www.facebook.com/tommyjovilello/

Thank you for following me in my art and life journeys!


Saturday, November 5, 2016

Another Chair Update

Who remembers these chairs that my neighbor gave me? I think I posted them on Instagram or my Facebook business page.


I wanted to do something a little different with them having already painted up some whimsy. I selected some scrap paper and DecoArt Americana paint colors to match.


Then, I went to work. After sanding the chair, I primed it. Then , I painted two layers of Americana Buttermilk for the base coat.  I covered the front of the backrest slats first.


My original idea was to paint accents on the legs with DecoArt Americana Purple Cow  (I love this color ALOT!!!) Instead, I adorned the back of the slats and the brace on the bottom with flowers from the papers.

Here are pictures of the front and back of the completed chair.


Thank you for following me in my art and life journeys. 


Tuesday, November 1, 2016

Angel Fish: Mixed Media

I'm getting ready to start a couple of new chairs, but I needed a diversion before getting too involved with them.

I recently got some new Daniel Smith watercolors that I have been dying to use , but I haven't gotten a box for them yet. So, for this piece, I used my Grumbacher watercolors.

I really enjoy the colors related to the tropics; so bright and fun and, I am currently inspired by tropical wildlife. I taught a class where the artists painted a flamingo. I painted geckos on the top of my whimsical chair. So, for this, I painted some tropical fish; angel fish to be exact.

I began with a pencil sketch and I really liked it. I, then, copied the first fish two more times, but changed the size.


I chose various colors of blue for the water.


I wanted bright colors for the fish and I accented the watercolors with Prisma colored pencils.


Afraid that blue or green might not stand out against the water, I was hesitant to use those colors on the third fish. I tried it and really liked the result.


I wanted to add some plant life, so I cut some green scrapbook paper and layed it on the picture to figure out the best placement.


I painted the strips in lime and grass greens and attached them with gel medium (changing the placement of course, it's how I roll). Lastly, I splattered white paint hoping that it would resemble bubbles. This is the finished piece and I really love the result.... oh, those colors!


Thank you for following in my art and life journeys.